How to Add an Email Address to the Whitelist in Microsoft Outlook
At Palzin Monitor, we understand the importance of managing your email effectively. While Microsoft Outlook's spam filtering feature is helpful, it may occasionally classify legitimate emails as spam. To ensure that emails from trusted sources are not flagged as spam, you can whitelist the email address. Follow the steps below to learn how.
Option 1: Adding the Email Address to Contacts
One way to inform Outlook that you want to receive messages from a specific email address is by adding it to your contacts. This action indicates that the sender is trusted, and their messages should be delivered to your inbox. However, this method does not guarantee that all future emails will bypass the spam filter.
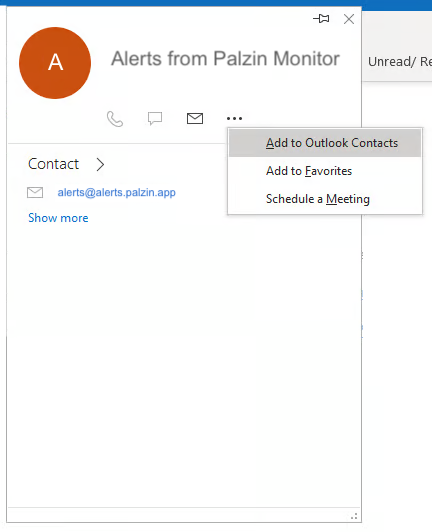
In the Outlook Desktop App:
- Open the email from the sender you want to whitelist.
- Hover over the email address of the sender to reveal an info-box.
- In the box, click on the three dots icon to open a dropdown menu.
- Select "Add to Outlook Contacts."
- In the newly opened window, fill out any optional information and click the "Save & Close" option in the toolbar at the top-left corner.
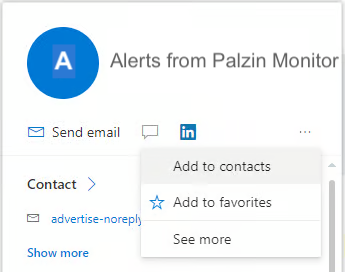
In the Outlook Web App:
- Open the email from the sender you want to whitelist.
- Hover over the email address of the sender to reveal an info-box.
- In the box, click on the three dots icon to open a dropdown menu.
- Select "Add to Contacts."
- In the newly opened window, fill out any optional information and click the "Create" option in the toolbar at the top-left corner.
Option 2: Adding the Email Address to Safe Senders
The recommended option is to add the email address to safe senders. This ensures that all future conversations with that email address won't be marked as junk.
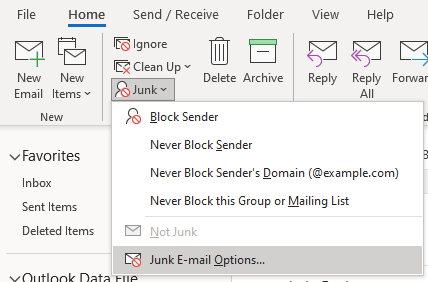
In the Outlook Desktop App:
- In the "Home" tab, expand the "Ribbon" to show more options and click on "Junk."
- Select "Junk E-mail Options."
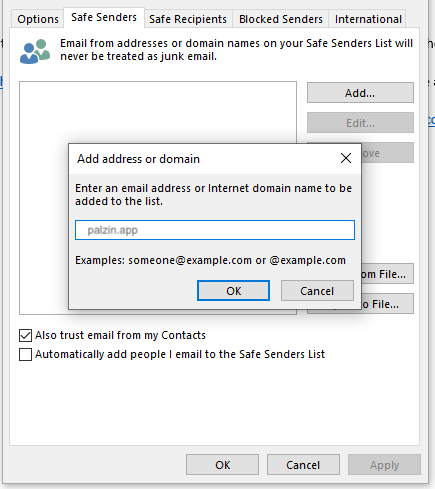
- Navigate to the "Safe Senders" tab.
- Click the "Add" button.
- Enter the email address in the field and click "OK."
- Close the "Junk E-mail Options" window by clicking "OK."
In the Outlook Web App:
- Click the settings (cog) icon in the top-right corner.
- Scroll down and click "View All Outlook Settings."
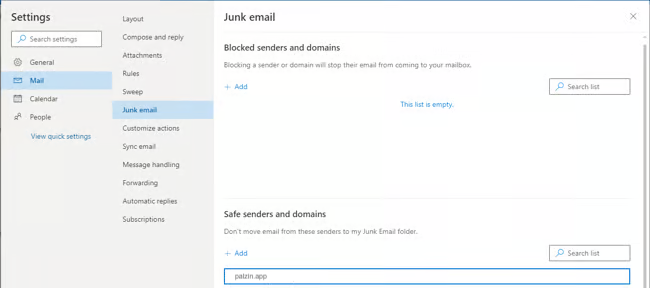
- In the "Mail" tab, go to the "Junk Email" section.
- Click "Add" in the "Safe senders and domains" category.
- Enter the email address in the input field and press Enter.
By following these steps, you can ensure that emails from specific senders are not mistakenly marked as spam in your Microsoft Outlook account. Palzin Monitor is committed to providing you with valuable insights and guidance for optimizing your email experience.


